Pre-Arm Safety Checks
ArduPilot includes a suite of Pre-arm Safety Checks which will prevent the vehicle from arming its propulsion system if any of a fairly large number of issues are discovered before movement including missed calibration, configuration or bad sensor data. These checks help prevent crashes or fly-aways but they can also be disabled if necessary.
Recognising which Pre-Arm Check has failed using the GCS
The pilot will notice a pre-arm check failure because he/she will be unable to arm the vehicle and the notification LED, if available, will be flashing yellow. To determine exactly which check has failed:
- Connect the Autopilot to the ground station using a USB cable or Telemetry.
- Ensure the GCS is connected to the vehicle (i.e. on Mission Planner and push the “Connect” button on the upper right).
- Turn on your radio transmitter and attempt to arm the vehicle (regular procedure is using throttle down, yaw right or via an RCx_OPTION switch)
- The first cause of the Pre-Arm Check failure will be displayed in red on the HUD window
Failure messages
Failsafes:
Any failsafe (RC, Battery, GCS,etc.) will display a message and prevent arming.
RC failures:
RC not calibrated : the radio calibration has not been performed. RC3_MIN and RC3_MAX must have been changed from their default values (1100 and 1900), and for channels 1 to 4, MIN value must be 1300 or less, and MAX value 1700 or more.
Barometer failures:
Baro not healthy : the barometer sensor is reporting that it is unhealthy which is normally a sign of a hardware failure.
Alt disparity : the barometer altitude disagrees with the inertial navigation (i.e. Baro + Accelerometer) altitude estimate by more than 2 meters. This message is normally short-lived and can occur when the autopilot is first plugged in or if it receives a hard jolt (i.e. dropped suddenly). If it does not clear the accelerometers may need to be calibrated or there may be a barometer hardware issue.
Compass failures:
Compass not healthy : the compass sensor is reporting that it is unhealthy which is a sign of a hardware failure.
Compass not calibrated : the compass(es) has not been calibrated. the COMPASS_OFS_X, _Y, _Z parameters are zero or the number or type of compasses connected has been changed since the last compass calibration was performed.
Compass offsets too high : the primary compass’s offsets length (i.e. sqrt(x^2+y^2+z^2)) are larger than 500. This can be caused by metal objects being placed too close to the compass. If only an internal compass is being used (not recommended), it may simply be the metal in the board that is causing the large offsets and this may not actually be a problem in which case you may wish to disable the compass check.
Check mag field : the sensed magnetic field in the area is 35% higher or lower than the expected value. The expected length is 530 so it’s > 874 or < 185. Magnetic field strength varies around the world but these wide limits mean it’s more likely the compass calibration has not calculated good offsets and should be repeated.
Compasses inconsistent : the internal and external compasses are pointing in different directions (off by >45 degrees). This is normally caused by the external compasses orientation (i.e. COMPASS_ORIENT parameter) being set incorrectly.
GPS related failures:
GPS Glitch : the GPS is glitching and the vehicle is in a flight mode that requires GPS (i.e. Loiter, PosHold, etc) and/or the cylindrical fence is enabled.
Need 3D Fix : the GPS does not have a 3D fix and the vehicle is in a flight mode that requires the GPS and/or the cylindrical fence is enabled.
Bad Velocity : the vehicle’s velocity (according to inertial navigation system) is above 50cm/s. Issues that could lead to this include the vehicle actually moving or being dropped, bad accelerometer calibration, GPS updating at below the expected 5hz.
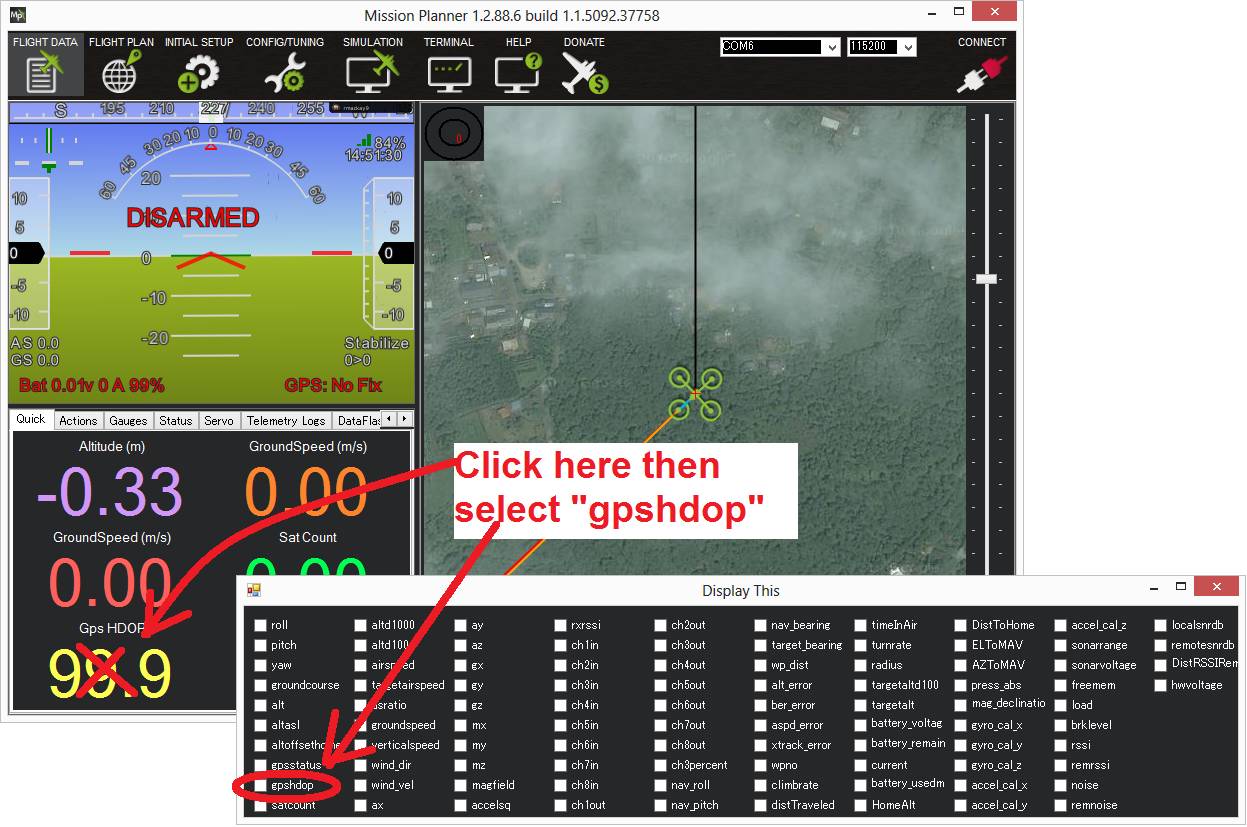
High GPS HDOP : the GPS’s HDOP value (a measure of the position accuracy) is above 2.0 and the vehicle is in a flight mode that requires GPS and/or the cylindrical fence is enabled. This may be resolved by simply waiting a few minutes, moving to a location with a better view of the sky or checking sources of GPS interference (i.e. FPV equipment) are moved further from the GPS. Alternatively the check can be relaxed by increasing the GPS_HDOP_GOOD parameter to 2.2 or 2.5. Worst case the pilot may disable the fence and take-off in a mode that does not require the GPS (i.e. Stabilize, AltHold) and switch into Loiter after arming but this is not recommended.
Note: the GPS HDOP can be readily viewed through the Mission Planner’s Quick tab as shown below.

INS checks (i.e. Acclerometer and Gyro checks):
INS not calibrated: some or all of the accelerometer’s offsets are zero. The accelerometers need to be calibrated.
Accels not healthy: one of the accelerometers is reporting it is not healthy which could be a hardware issue. This can also occur immediately after a firmware update before the board has been restarted.
Accels inconsistent: the accelerometers are reporting accelerations which are different by at least 1m/s/s. The accelerometers need to be re-calibrated or there is a hardware issue.
Gyros not healthy: one of the gyroscopes is reporting it is unhealthy which is likely a hardware issue. This can also occur immediately after a firmware update before the board has been restarted.
Gyro cal failed: the gyro calibration failed to capture offsets. This is most often caused by the vehicle being moved during the gyro calibration (when red and blue lights are flashing) in which case unplugging the battery and plugging it in again while being careful not to jostle the vehicle will likely resolve the issue. Sensors hardware failures (i.e. spikes) can also cause this failure.
Gyros inconsistent: two gyroscopes are reporting vehicle rotation rates that differ by more than 20deg/sec. This is likely a hardware failure or caused by a bad gyro calibration.
Board Voltage checks:
Check Board Voltage: the board’s internal voltage is below 4.3 Volts or above 5.8 Volts.
If powered through a USB cable (i.e. while on the bench) this can be caused by the desktop computer being unable to provide sufficient current to the autopilot – try replacing the USB cable.
If powered from a battery this is a serious problem and the power system (i.e. Power Module, battery, etc) should be carefully checked before flying.
Parameter checks:
Ch7&Ch8 Opt cannot be same: Auxiliary Function Switches are set to the same option which is not permitted because it could lead to confusion.
Check FS_THR_VALUE: the radio failsafe pwm value has been set too close to the throttle channels (i.e. ch3) minimum.
Check ANGLE_MAX: the ANGLE_MAX parameter which controls the vehicle’s maximum lean angle has been set below 10 degrees (i.e. 1000) or above 80 degrees (i.e. 8000).
ACRO_BAL_ROLL/PITCH: the ACRO_BAL_ROLL parameter is higher than the Stabilize Roll P and/or ACRO_BAL_PITCH parameter is higher than the Stabilize Pitch P value. This could lead to the pilot being unable to control the lean angle in ACRO mode because the Acro Trainer stabilization would overpower the pilot’s input.
Battery/Power Monitor:
If a power monitor voltage is below its failsafe low or critical voltages or failsafe remaining capacity low or critical set points, this check will fail and indicate which set point it is below. It will also fail if these set points are inverted, ie critical point is higher than low point. See Battery Failsafe for Copter, Plane Failsafe Function for Plane, or Failsafes for Rover for more information on these.
In addition, minimum arming voltage and remaining capacity parameters for each battery/power monitor can be set, for example BATT_ARM_VOLT and BATT_ARM_MAH for the first battery, to provide a check that the battery is not only above failsafe levels, but also has enough capacity for operation.
Airspeed:
If an airspeed sensor is configured, and it is not providing a reading or failed to calibrate, this check will fail.
Logging:
Logging failed: Logging pre-armed was enabled but failed to write to the log.
No SD Card: Logging is enabled, but no SD card is detected.
Safety Switch:
Hardware safety switch: Hardware safety switch has not been pushed.
System:
Param storage failed: A check of reading the parameter storage area failed.
Internal errors (0xx): An internal error has occurred. Try rebooting.
KDECAN Failed: KDECAN system failure.
UAVCAN Failed: UAVCAN system failure.
Mission:
See ARMING_MIS_ITEMS
No mission library present: Mission checking is enabled, but no mission is loaded.
No rally library present: Rally point checking is enabled, but no rally points loaded.
Missing mission item: xxxx: A required mission items is missing.
Rangefinder:
IF a rangefinder has been configured, a reporting error has occurred.
Disabling the Pre-arm Safety Check
Warning
Disabling pre-arm safety checks is not recommended. The cause of the pre-arm failure should be corrected before operation of the vehicle if at all possible. If you are confident that the pre-arm check failure is not a real problem, it is possible to disable a failing check.
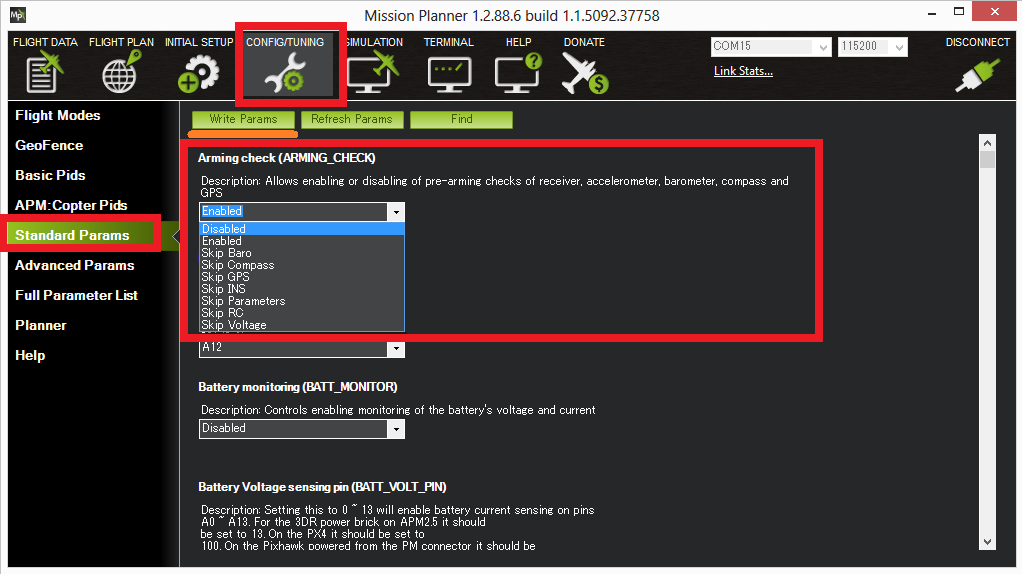
Arming checks can be individually disabled by setting the ARMING_CHECK parameter to something other than 1. Setting to 0 completely removes all pre-arm checks. For example, setting to 4 only checks that the GPS has lock.
This can also be configured using Mission Planner:

- Connecting your Autopilot to the Mission Planner
- Go to Mission Planner’s Config/Tuning >> Standard Params screen
- set the Arming Check drop-down to “Disabled” or one of the “Skip” options which more effectively skips the item causing the failure.
- Push the “Write Params” button